Showing posts with label EVRR. Show all posts

Thursday, December 18, 2025

A 'simple' colourization of a photo of E. L. Moore's Elizabeth Valley Railroad

Gemini's colourization of an EVRR photo after 4 or 5 prompts

I'm more and more intrigued with the idea of colourizing E. L. Moore's photos of his layouts and dioramas, especially his Elizabeth Valley Railroad. I wanted to do a little test, and decided to ask Gemini to colourize a fairly generic photo of the EVRR. The black-and-white photo below is the one I used:


I'm not going to show the various intermediate steps, but after receiving the initial colourization I asked Gemini to match the colours of the Red Eye Saloon, the Elizabeth Valley station, and the Rocky Ridge depot with the colours they actually were - Gemini had made some guesses.

What it did surprised me: as well as changing the colour on the Elizabeth Valley station and the Rocky Ridge depot Gemini also changed a few details on those buildings. If you look closely you'll see for yourself.

The lesson for me is I'm going to have to create a procedure to retain structural  details across prompts for colour changes. This is something I wasn't expecting, and it makes the colourization exercise somewhat more challenging.

Tuesday, December 16, 2025

An enhancement of the track plan for E. L. Moore's Elizabeth Valley Railroad

An enhancement created by Gemini of the photograph of the postcard track plan

Longtime readers may remember that from fall 2016 to spring 2017 there was a big hunt on here to figure out the track plan of E. L. Moore's Elizabeth Valley Railroad. It came to a conclusion when a generous reader sent me a photograph of one of the postcards Mr. Moore mailed to readers who wrote him asking about the EVRR track plan. He had a stack of postcards printed with the track plan on them. That's a photograph of one of the postcards shown below that the reader sent me.

A photograph of E. L. Moore's postcard track plan of his EVRR

Well, it's actually an enhancement of the image that was forwarded to me. I cleaned it up a bit to get a little better contrast. The labels aren't very clear, but the overall track plan is and ended much speculation. 

As I've been asking Gemini to do photo enhancements recently I wondered if it could clean up the track plan and read the labels on it. The lead photo to this post is what Gemini produced.

The track plan drawing is quite decent, but the labels are either dead wrong or gobbedygook. I know, and you know too, they're wrong because they don't correspond to what's at the various locations as seen in photographs of the layout.

However, I was intrigued that it put some writing that is supposed to be E. L. Moore's handwritten signature and the year 1948 in the bottom right corner. I don't see that in the original at all, and we've seen enough of Mr. Moore's signature to know the one in Gemini's image is fake; however, it was the year 1948 the caught my attention. From what we know it's conceivable he came up with the track plan in 1948, but I think he drew the postcard plan in the mid to late '50s to deal with requests. 

I started to wonder about Gemini's ability to decipher written text so I asked it to read E. L. Moore's handwritten note that appears on the back of the postcard. Here's the high resolution image I entered into Gemini for deciphering (so you can test your skills against its!):


Here's what it came up with:


This is my reading:

Here you are tho you may need a magnifying glass. Radius, elevation, wiring connections, sections all marked, if you can find em. 
Good luck, 
signed E L Moore

I think sections is more correct than signs because sections - meaning how the track has been divided into electrical blocks, or 'sections' in model railroading parlance - is more meaningful to model railroaders who are going to build this track plan. 

Regarding sections, I should review the markings in Gemini's plan that would indicate sections to a model railroader and see how they compare to my guesses about how the track was electrically divided into sections, or blocks.

I guess one lesson here is if a person can sort of read some blurry text it's likely that Gemini can also take a stab at it, but if a person just can't read it, it's unlikely Gemini can either. And, and this is a big and, without other knowledge brought to bear on Gemini's output, one must take that output with a considerably big grain of salt.

Wednesday, January 31, 2024

First draft of an EVRR control panel

First draft of a control panel schematic

One thing I didn't mention in the EVRR video was that there several possible electrical decompositions of the layout. All involve dog-bones with a reversing loop on each end. After thinking things through a bit more I'm likely to go with the electrical layout shown in the schematic on the left.

In this scheme the upper loop has been moved over to the right so it doesn't over lap and confuse the track in the valley.

New decomposition superimposed on track plan
This new decomposition  is also a dog-bone (shown by the blue line) with the lower loop going around the big lake instead of more-or-less the entire valley. This leaves the valley track (shown by the green line) as a completely separate block where a second locomotive could do some switching, isolated from the loco running the dog-bone


Decomposition shown in the video
Over on the left is the electrical decomposition shown in the video. In this version the loop in the valley is much larger. The problem is the green leftover track sections are just that, leftovers. On the new plan the green track is almost a second switching layout.

E. L. Moore could have used either scheme, or something else. I have no information on how it was wired so it's basically an aesthetic judgement about which to use. Right now I'm thinking the new one is the one.

Next up will be giving some thought to making the schematic a lot more understandable :-)

Tuesday, January 30, 2024

EVRR Feedback

The future EVRR control panel

Much to my surprise I’ve gotten considerable offline feedback on the Elizabeth Valley RR video. There seems to be some interest in that little layout. Given the complexity of the track plan the question was raised again about whether it actually ran. Even though I’ve never seen a picture of a control panel for it I think it did run. I recall this passage from a long letter E. L. Moore wrote to Andy Anderson on 3 December 1965 where ELM hints that it did run:


“Again this fall I decided maybe I’d get rid of that 4x6 Elizabeth Valley. I turn on the lights [JDL: I assume he means the room lights, but maybe he means the layout lights], pull back the dusty plastic cover, then for no good reason at all clean up the tracks and give her a try. Once a year, I do this. Nostalgia gets me, and I decide not to bother to sell it.”


It’s just a hint, but a strong one. 


Way back when I decided that even though I didn’t know what the EVRR’s control panel looked like I’d nevertheless keep in the Moorian spirit and build a control panel based on the foundation he used for his Enskale &Hoentee RR: a Tampa Nugget cigar box! With the cigar box found I looked around the workshop and dug up the DPDT and SPDT switches I had stashed away for this project. However, they now strike me as too big and I’m going to replace them with miniature ones. I also need to figure out how to connect the wiring bundle from the control box to the layout so everything can be easily disconnected for transport.


Anyway it’s nice to see some interest in bringing this layout to life.

Tuesday, January 23, 2024

Status of my N-scale tribute to E. L. Moore's Elizabeth Valley RR


My little, unfinished N-scale version of E. L. Moore’s Elizabeth Valley RR (EVRR) has been hanging on my workshop wall for a long time. Lately it has been giving me some accusatory stares along the lines of was I ever going to finish it :-) To tamp down the nagging voices in my head, and maybe start things off on the road to finishing it, I decided to make a video that would document where the layout’s at construction wise. The video making process has helped me look at the project with fresh eyes, and some improvements are now quite clear: extending the front a little with foam, maybe trying an alternative track block decomposition, replacing a valley track segment with one with a little bigger radius, and so on. The video segments are a little disjointed - and take the dates I mention with a grain of salt - but hopefully the big picture comes across.

Saturday, June 17, 2023

Wednesday, October 13, 2021

Elizabeth Valley RR in N-Scale Magazine

Paul informed me the article he wrote on his N-scale version of E. L. Moore's Elizabeth Valley RR is in the November / December 2021 issue of N-Scale. His layout is excellent, and I'm very glad to hear that N-Scale magazine published his article. I gotta pop out to the hobby shop and get myself a copy.

Thursday, July 29, 2021

E. L. Moore's Branch Line Station: Two scales, double the fun!

Original Rocky Ridge Station on E. L. Moore's EVRR layout
Once upon a time E. L. Moore had an HO scale layout called the Elizabeth Valley Railroad. Nestled in one corner was the Rocky Ridge Station. Let's let Mr. Moore take the story from here:

It seems that of everything I build I eventually get around to making two, and this is my second station of this type, having built my first one some ten years ago, and then in a weak moment selling it and now finding I need another.

It's that 'another', the second build, that's in the collection of E. L. Moore buildings. Mr. Moore continues:

It fits so well on a certain curve on my pike that the only change I made was that the first was built of capped siding while this one is made entirely of balsa.

So begins E. L. Moore's Branch Line Station article that appeared in the April 1964 issue of Railroad Model Craftsman.

This little station is another of my favourites, and since the N-scale EVRR tribute layout needed one, I had a perfect excuse for diving in and building one in N-scale. Those wires you see in the photos are from my model. Mr. Moore's makes no provision for interior lighting, unlike his first version which you see lit up in the night photo of his layout.

The model arrived more-or-less as I saw it back in 2015, although some details had come loose and had to be re-glued. As well, the chimney was cracked and the train order signal had to be unbent.


The model was easily fixed up with a little Weld Bond. If you look at the article you'll see that there were many other details in the scene like milk cans, a wagon wheel, and some barrels and furniture. None of those were present, but I suspect some eBay searching might unearth some of those accessories. 


You'll notice that the bottom step on the front platform's set of stairs is missing. I went back through the packing materials with a fine-tooth-comb as they say, but it wasn't there. The 2015 photos show it was also missing then, so I suspect it's been gone for a long time. 

But, the search was not without its rewards. I found that figure in the very bottom of the wrappings. It looks and feels like a Weston figure. I don't see him appearing in the article's photos, but E. L. Moore used a lot of Weston figures, so it'll no doubt come in handy.


This station is quite small, and even smaller in N scale. 

I had to laugh when I saw Mr. Moore's model had brown doors and yellow trim, and I used yellow doors with brown trim. I don't recall if I did that deliberately, but makes for a nice contrast.

You can also see that I need to add a train order signal. I'm quite impressed with Mr. Moore's. His is made from thin brass, and will turn in its support so you can change signals.

The size difference is quite apparent in this view.


The chimney guy wires on E. L. Moore's model are actually wire, not thread as I had mistakenly thought. Also, look at that window frame. It's quite fine and nicely proportioned.

In this view the weird little warp I have in the back corner of my model is embarrassingly clear for all to see :-(


His roof uses his standard woodburning technique for etching the shingle pattern into balsa sheets. Mine, again, uses the paper strip technique.


To wrap up, I thought I'd test place the N scale station on the layout to see how it looked. It seems about the right size. I tried powering up the station's light with a battery, but although the light lit, the battery was too weak for anything other than a dull glow. I need some new batteries, and probably a dedicated power supply for these sorts of tests.

Wednesday, June 16, 2021

Did E. L. Moore's track plan actually work?

I've been thinking about scrapping the N scale EVRR layout along with the HO Ocean Park Loop as part of making a new start. I've stalled out at wiring the control panel. I was talking about this with Vince a few weeks ago during a discussion about wiring reversing loops, and he asked an intriguing question: Did E. L. Moore ever get his layout - the HO scale EVRR on which my N scale version is built -  to run?

It's a good question as the track plan is complex, and Mr. Moore wasn't a person who liked dealing with complex electricals. I've not seen a control panel for his layout, although he hints at the block locations in his postcard. I think his layout did run, but if he wired it, what the control panel looked like, or if he ran it much are interesting questions likely to never be answered.

Thursday, January 14, 2021

Workbench Scenes: N gauge test track

Kato powered chassis zooming around test loop.

I was rooting around in the crawl space and came across my old lumpy loop N gauge test track I used to test the EVRR loco and cars. The loop was in a bit of a sorry state, so I decided to clean it, fix it, and give it a try with my N scale fleet to see how they were running - and for a bit of simple fun :-) Fleet is a grand word for a Bachmann 0-6-0 loco, a TTC PCC streetcar, and a Kato 11-104 powered chassis. Luckily the 'fleet' still worked, so I polished all the members up a bit with a dusting off and lubrications all round. It's nice to see these running.

Saturday, October 26, 2019

Standing desk for hobby bench

Over the last few months I've been looking for some sort of desk frame that could be adjusted to either a standing or sitting position to replace my workshop hobby bench. I've found the 45" height of my layout to be quite comfortable to work at, and thought an adjustable standing desk might also be good for general hobby work.

In the end I bought an adjustable desk frame from Lee Valley (catalog item 00580.37) and attached a recycled 2'x4'x1/2" pressboard top. The frame has a manual hand crank that allows the top to be lowered to a sitting position, or raised up a standing position that's well above the top of my layout.

I also replaced the frame's stock foot pads with locking casters (Lee Valley item 00K27.40) so the table can be rolled around to wherever it's needed. The casters are probably not rugged enough for general workshop use, but the frame is well within their load carrying capacity. For lightweight model building work these casters are fine, but I wouldn't sit or stand on this desk, or subject it to hard use.

One benefit I see is it should make working on the Elizabeth Valley RR somewhat easier as I've had a problem with finding a good stand for it while I'm fiddling with it. Now I can crank the desk up to full standing position and work on it with the same ease as the OPL.

Tuesday, September 24, 2019

Hanging out with the EVRR

The N-scale Elizabeth Valley RR is hanging on the wall behind my desk boring accusatory holes in the back of my head as to when I'll finish it. I try explaining that I think I bit off more than I can chew when I started it, but there's no appeasing it. I'm thinking that if I could dedicate 2 solid weeks to it, I could at least have this monster scenicked and running, but there'd be next to no buildings, and that awesome bridge that cuts across the centre would still need to be done. Finding 2 weeks, there's the trick.

Saturday, October 27, 2018

Running the upper loop on the Moore & Moore Lines

Darrell Poole sent me a link to this first video of his HO scale Elizabeth Valley RR tribute layout of trains running on the upper loop. He's made excellent progress, and the layout and video are looking great! I'm looking forward to seeing how this railroad develops.

Friday, April 13, 2018

E. L. Moore's Mountain Cabin

Last night I was looking for photos of the portal on the other end of this tunnel. No luck. I'm going to assume the portals at both ends are more-or-less the same.But I did see that little cabin on top of the mountain in one photo and snipped it out. It appears to be closed-up for the season. That is going to be a tiny model in N-scale.

Tuesday, April 10, 2018

33 to 41 for 2

Layout height is often a concern and although it’s not a big one, it has some implications. Over the past few weeks while working on the Alta Vista TC, I’ve come to appreciate its street-level height of 41 inches above the carpet as it’s very comfortable for me to work at while standing. I’m 5’-8”, so your dimensions may vary.
By contrast, the EVRR has always been on a Workmate during construction, and its 33 inch height I’m finding less than optimum. It’s awkward for sitting at as I always seem to be reaching across it to other places and bumping things. And it’s much too low for standing while working. I’m going to raise it to 41 inches or so, and place it directly under some room lights so illumination is improved. Perhaps that will speed up progress :-)
When it comes to showing off these layouts, and especially the Alta Vista TC, I want to boost them to close to eye-level. My rationale is this: when I’m riding the streetcars and buses and subways of Toronto, I’m experiencing everything at eye-level, not from some giant’s aerial perspective. Even at 41 inches, roofs dominate the view and I don’t want that. Also, with the Alta Vista TC’s bent island design, the higher street-level will allow viewers to walk-around, look around corners and down streets much like in they would in the world. All this might not apply to the EVRR – it might have it’s own unique height that gives best viewing. Some experimenting is probably called for.

Sunday, April 8, 2018

EVRR tunnel portal #2

Last night I spent a little time looking through E. L. Moore's EVRR photos for a good picture of the tunnel portal that appears on the level below the stone one. These 2 snippets are all I could find. It's some sort of wooden crib and box-like structure. Clearances are tight in that area of the layout, so some careful measuring will be called for before I start to build. Also, there's a switch just inside the portal, so that'll complicate things.

Thursday, April 5, 2018

Partial portal progress

I used a sharp, new X-acto knife blade and some sanding sticks to stair-step the portal abutments, and when that was done, they were given thin washes of grey, white and Tamiya Smoke to naturalize and tone down their colours. They’re looking better, but they’ll likely need a little more blending and weathering once they’re installed.

And speaking of colours, I have no colour reference photos of the EVRR. No drugstore processed snapshots, no Kodachromes, no Ektachromes, no Fuji Chromes, no torn out photo-spreads from magazines, no nothin’. I don't even know if any exist, but be that as it may, this is a world-wide call: if you have any and could share, please leave a comment. There’s no money involved, but think of the glory :-) Maybe I should see if Vince has the time machine repaired. Until next time ….

Sunday, April 1, 2018

Try wood burning for tunnel portals!

E. L. Moore published 2 articles about using a woodburning pen as a modelling tool: Burn those models in the May '55 issue of Railroad Model Craftsman, and Modeling with a burning tool in the July '62 issue of Model Railroader. The second one includes a photo of an EVRR stone tunnel portal as an example. That being the case I figured I'd pull out my woodburning pen and try making some N-scale tunnel portals.
I haven't used the pen in quite awhile. I think the last time was on one of the very first projects in the E. L. Moore in the 21st Century series. 
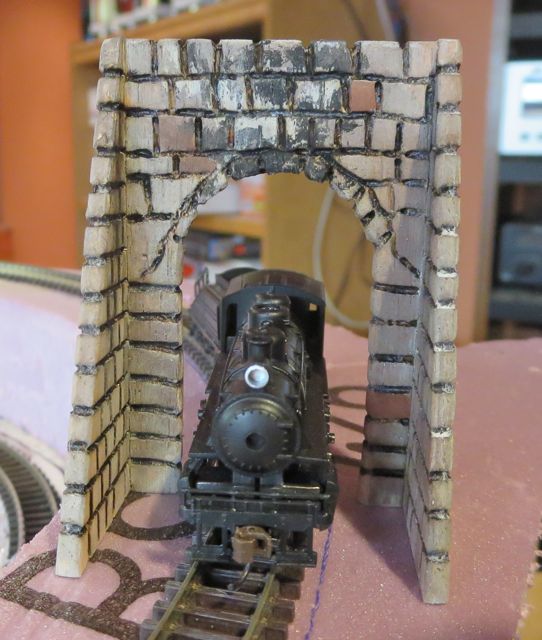
I decided to practice by building the river and road portal that appears under the EVRR's Rocky Ridge. The portal was sketched on a piece of 1/8 inch thick balsa and the openings were cut out prior to burning.
After burning in the mortar lines this is what it looked like. You can see it's more of a caricature of a portal than a true scale representation. Likely I could do better with a more precise initial sketch and a finer pen point, but this a model railroad in the old folk-art-style of construction, so I think it'll fit in.
After a bit of dry-brush painting with greys and browns, voila!
Then there was a little test fitting over the Rocky Ridge inlet and once satisfied that it fit, it was on to the mountain portals.
I printed out the MR '62 article and found that when I placed my loco on the image it was about the same size as the loco in the photo. From that and studying other photos of those stone portals I came up with some dimensions.
Both portals were drawn side-by-side with the intent of slicing them apart after burning. The track clearance is on the tight side given the clearances on the layout. If the rolling stock were longer than the old-time pieces that this layout uses, the portals would not be wide enough to accommodate them.
I had started the mountain portals I had gotten the hang of using the burning pen and things went a little faster. Once again, this is a caricature of a portal and not a model. 
For all the portals I used the 'pen' tip in the burning tool as it seemed to have the finest point of the lot I had on hand. Its edge was used to burn in the block sides.
After burning, the pieces were cut out in preparation for gluing on the abutments, which were made with the techniques shown above. 
As I worked on this little project I started to think that the woodburning pen is close to being the ultimate tool for folk-style model building. 

Let me backup a bit. I think E. L. Moore was the last and the best of what might be called the folk-art-style model railroaders. That approach to model railroading leans heavily on non-specialized materials and tools that can be found around the house or easily obtained at nearby stores. It doesn't completely forsake specialized components produced by the model railroading industry, but it's not dependent on them. 

The woodburning pen allows you to create, as E. L. Moore put it in his Model Railroader article, shingle or shake roofs, clapboard siding, brickwork (foundations and chimneys), stonework (foundations, chimneys, portals, bridge sides), platform planking, board siding, plank floors; simulating cracks, knotholes; aging surfaces; making sheathing for coach, caboose or boxcar.* With that capability you don't need to buy a lot of things on offer in the magazine ads. That makes woodburning economical, and a bit subversive as you're saving money, which was important for Mr. Moore as he had modest means, and bypassing the messaging of the advertisements. These go against the prevailing culture.

I've often received feedback that finescale approaches, their materials, tools and practices, are the ones to be admired and pursued, and others, like those exemplified by E. L. Moore, are of little concern, and if continued, represent a regression and lack of understanding concerning what the hobby is about. Myself, I think there are different approaches or styles. Finescale and the desire for high fidelity is one approach - a very admirable one - but there are others. Frankly this idea of different styles didn't dawn on me until I was deep into the E. L. Moore story. I realized he was driven to express his thoughts and experiences of early 20th century life and railroading, but he was on the low end of society's slippery economic pole, so he got on with things with what he could readily access, but he didn't forsake making things as good and accurately as he possibly could - that wasn't abandoned or ignored. He was driven to express what he had to express for some reason known only to him. Would his work qualify as museum quality artifacts that could represent objective historical facts? No. Does that matter? 
[I've known for awhile that the back stretch will need to be widened with a piece of foam glued to the back edge. This proves it.]

Ok, I did take a stab at thinking about styles , although I didn't exactly think of them as styles, well before the E. L. Moore journey. Looking back, I don't completely agree with my original assessment in that post as the journey has taught me a lot. I didn't know folk-art-style existed and was a legitimate approach. I'm not happy with the term 'folk-art-style' because it conjures up images of basket weaving and hippies, but it's not far off from the stuff categorized in the mainstream art world's folk art category, so I'll hang on to it until something better comes along.

A question that I ask myself is if the so-called folk art style is actually a legitimate style, or just a historical phase that the hobby went through. It was the dominant style at one time because to proceed that was what one did, so it's historical origins can't be denied. Today we have options even though it doesn't seem that way from many of the companies or publications. I'm still pondering this one.

So, if one isn't predisposed to buying a lot of specialized model making materials, developing skills with the woodburning pen is a good thing. Although, I imagine woodburning techniques work best in HO and larger scales; but for caricatures, they're ok in N. 

---

* The brick walls of E. L. Moore's Firehouse model were made by scribing a brick pattern into sheets of balsa. Did he use a woodburning pen? Maybe, but I don't think so. Here's a detail shot of the brick pattern. It looks a little too clean for woodburning.