Showing posts with label Art Metropole. Show all posts

Saturday, March 6, 2021

A repurposing of Heljan kit B120

I don't think I've written about the conversion of Heljan's kit B120 to The Cake Lab, but since I mentioned the kit in the concluding Art Metropole post I thought I should at least show the kit that donated the crown decorations.

I bought the kit sometime around 2014 or so at George's Trains. It's a rather nice example of a modern train station. Although of European architecture, I thought the basic building wouldn't be out of place in a mid-century Toronto setting. In 2016 I repurposed it into The Cake Lab, which was the name of a company a friend of ours had recently started. I didn't use the kit's decorations on the model, so they were stashed away in the spares box for 'future use'. It turned out the future arrived a few weeks ago!

Monday, March 1, 2021

The Art Metropole is finished... well, sort of

Left: back wall in; Right: back wall out

Over the last couple of weeks at the 30Squares World Domination HQ we got to talking about why human beings make models. We didn't come to any conclusions, but at some point I got to thinking about scale models and magic tricks. 

A lot of people are fascinated by miniatures. Likewise for magic tricks. Both have a special power to captivate. There's a centuries long history, but one aspect seems relatively modern - well, big picture modern, not last week modern - is the desire to know how it's done. Exactly how are those miniatures made? How did they pull off that magic trick? What are the secrets? Maybe that's what the how-to articles in all the model building magazines are satisfying: the desire to know the secrets to special powers. I recall reading somewhere in Smith and Ellison's book, Elgin Park: Visual Memories of Midcentury America at 1/24th Scale, that one commenter on Mr. Smith's work couldn't believe that his photos were shot with a relatively simple digital camera and lots of savvy in setting up believable forced perspective shots. The commenter got agitated, and huffily stated that clearly Mr. Smith was withholding information; holding back the secret. I guess to some the secrets better be worthy of being secrets, and that they're not being taken in by simple stuff that should be obvious.

I'm hardly a wizard of scale modelling, and my bag of secret tricks is pretty small, but I'm attempting to get back to talking more about what goes at the workbench regarding my projects. I'm also trying to get back to trying more things and being a little more experimental. Not experimental in an earth shattering way, but trying things that are new to me. Looking back over the blog I used to do that more than I've done recently. Maybe some worthy secrets will be unearthed, maybe not, maybe it'll all be obvious stuff. Hopefully it'll be interesting.

I don't think there were any secrets in the Art Metropole project, but to me it was a different sort of build, and one where I hoped to test some ideas I've had in mind for awhile. Let's pick up where we left off.

In the last instalment I finished applying the overlays to the 2nd and 3rd floors. I then moved to the top floor and cutout its overlay. Like the others, this one is cut from 4-ply, 500 series Strathmore Bristol board.


Cutting the semi-circle into the card wasn't too difficult. It was simply a job for my circle cutter. It was shaping the trim strips that was tricky.

The outer trim is made from Midwest #8001, 0.0208" x 0.0312" basswood strip. I calculated the length of wood needed for the arch, cut a piece of basswood to size, and also cut a template in a scrap of 4-ply that could hold the arch trim. I soaked the basswood in warm water, and then after a few minutes bent it to shape and inserted it into the template to dry. I popped it out after an hour or so and was left what you see in the photo. It sprung out a little, but was curved enough for me to bend it back to shape without breaking for gluing to the overlay.

I apologize for the blurry photo, but hopefully you can see that the outer arch trim has been glued in place with Weld Bond, and the inner piece - suitably soaked in water to make it pliable - has been placed inside the outer arch while it dries. When dry it was trimmed to fit and glued in place.


The arch trim was the trickiest to apply, and once that was done the relatively straightforward job of cutting and gluing all the other pieces of wood and card trim was done. 

If you compare this to the prototype you'll see that I've simplified the design, although I've tried to capture the essence of things with materials I had on hand. 


After the glue had set I decided to go ahead and brush paint the facade with Model Master Aged Concrete Flat acrylic paint. I use that colour a lot in my work and when I heard the Model Master line was being discontinued I bought out the remaining bottles at my local hobby shop. Hopefully my stock will last awhile, but when gone, I'll need to figure out how to mix an equivalent.


The inner surface was blackened with a Sharpie pen. 

You may recall in an earlier instalment I called the facade layer 1, and layer 0 was a sheet of transparent plastic whose purpose was to form all the windows.
 
I decided to cut layer 0 into 3 separate pieces: one for the top floor, a second for the two middle floors in that rectangular opening, and a third for the ground level shop. I did this because I didn't think I could precisely layout all the window frames for all floors on one sheet and get everything to line up properly in all the openings. Three separate pieces gave me a chance to make adjustments if I didn't draw things out as accurately as I planned. This turned out to be a good move :-)


I don't have any action shots of the windows being built, but it's fairly easy, although a bit tedious.

First, the frames were drawn on the clear plastic with a black Sharpie pen. I ink both sides of the plastic to maximize the opaqueness of the lines. 

Pieces of basswood were then sized and cut to build out the frames. I used two sizes of wood: the aforementioned Midwest for the thin pieces, and HO scale 2x4 scale lumber from St. Albert Scale Lumber for the wider pieces. All were glued on with Weld Bond. 

Oh, I should mention the wood strips were inked with the black Sharpie pen prior to cutting.

The black panels between floors are cut from black construction paper.


You'll notice the crown decorations aren't prototypical. I couldn't match what was on the actual building, so I decided to use a moulding left over from Heljan's kit #B120. 

You see those birds with crowns in the photo? I sliced off the crowns, cleaned them up a bit, painted them flat black, and glued them to the panels between the floors.

Those letters are items from Model Builder's Supply that I used to make the sign on the ground floor shop. I believe the letters are 3mm tall.


All the windows are built up using the method applied to the centre section. Only the doorway on the ground floor is a little different. It's made from 3 pieces of clear plastic, which were glued into a box once the frames were applied. A roof was made from black construction paper, and the street number is from some very old Letraset.


Once the windows were done, it was on to building a box to stick to the facade.

In retrospect, I did this part in the goofiest way possible, but it seemed like a good idea at the time :-) 

I made 4 little boxes from 4-ply card and 1/8" square stripwood; one box for each floor. 

They were all glued together in a stack. It's a rather wobbly stack at this time, and eventually side panels from 4-ply card were glued to the outside. These additional pieces firmed things up considerably.


Jumping ahead a bit, you can see that when the stack is finally glued to the facade, it does form a solid structure. So, if you follow my goofy process, it does work out in the end.

I thought for quite awhile about outfitting the interiors. In the end I just cut pieces of decorative paper and glued them to the walls. The floor coverings are cut from a light blue construction paper. The ceilings are left the white of the 4-ply.


You might be wondering, what's up with the back wall?

First, on this project, my main concern was building a credible facade that was as reminiscent of The Art Metropole's as I could get with on-hand materials. I didn't care if the sides and back were unprototypical. That's why the side walls are not as deep and are much squarer than the prototype's, and why the back wall has no detail.

In fact, the back wall is designed to slide out to expose the interior. This was done for two reasons: so I could stage different interior scenes, and use a camera to shoot pictures of the street from inside the building. 

The back edges of the stack have styrene H-columns glued on to act as guides for the back wall to allow it to easily slide in and out. There's also a piece of styrene strip along the bottom of the guides to block light from entering the building when the back wall is in place.

I did the easiest thing possible for finishing the sides and back in accordance with my simplicity theme for these parts: Micro-Mark self-adhesive brick paper was attached. 

Oh, did I mention the severed heads?

Wait! No need to leave. Let me explain.

The topmost edge of the prototype's facade has 5 of what look like heads of lions, or maybe bears. I stupidly thought they were bear's heads, and wondered how was I going to model them?

No problem. The heads are small; they're HO-scale. I'll cut the heads from 5 human figures, doctor them a little with sand paper, paint them flat black, and no one will be the wiser. I had some scruffy Model Power figures who each made a donation.


Yeah, you're right. They look more like that face-on-Mars trick-of-the-light illusion than bears or lions, but, ok, they add to the mystery of the place. I did warn you in the opening that my bag-of-tricks was slim indeed :-)
The roof surface is a piece of fine grit sandpaper glued to the upper surface of the topmost box in the stack. It has no detail other than painting.


And speaking of paint, I did a little test and gave Revell Aqua Color, #36106 Tar black, a try for colouring the roof.

With Model Master paints being discontinued, I'm looking around for other brushable acrylics. I also use a few Tamiya acrylics, but I don't want to be limited to them. I had read that Revell was good for brushpainting, but it wasn't until a week or so ago I saw them at a local hobby store.


The paint is quite good and went on well. The container seems a bit odd. It takes a press and twist action to remove the lid. No problem, but I worry a bit about spilling the paint. I imagine with practice this won't be a concern. I'll have to buy a few other colours and continue my little tests.


That's about it for now.

What about the "... well, sort of" in the title? I haven't figured out how to do the painted sign on the side wall. Vince and Dave have helped me determine its wording, and made some suggestions about how to proceed, but I need to come up with an easy way to apply the sign to the walls. Stay tuned.

As well as that, I want to take some photos of the building on the layout, and see if I can take some photos of scenes from the building's interior, as that's one of the reasons I built this model.

One of the other reasons was that I wanted to try some construction methods that I thought of using on a model of the old Simpsons store on Queen Street W. I'm going to need easier and simpler methods for that project. I liked working on The Art Metropole building, but the construction methods were too involved to consider using them on a large model. Hopefully there're interesting projects ahead.

Tuesday, February 9, 2021

Art Metropole: 2nd & 3rd floor overlays

I continued on with applying 'stone' overlays to layer 1.

While working on the middle section I swung firmly towards making this model an approximation of the real thing and not an exact replica. Overall, the facade has an Art Metropole feeling, but close examination shows liberties have been taken.

For example, I've added some trim with 2"x4" scale lumber to accentuate some lines in the reference photos, but they aren't exactly correct.

Interestingly, this deviation from the prototype didn't seem to bother me as I found work on this section as calming as work on the ground floor. Strange.

It's on to the top floor and the decorative work around the semicircular window.

Sunday, February 7, 2021

Art Metropole: Street level overlays

Pieces of 2-ply, 500-series Strathmore Bristol Board were cut and attached to layer 1 to represent different stone layers on the street level portion of the facade. It isn't an exact replication of all the stone work, but just captures the largest features. All pieces are attached with transfer tape.

Hmmm. The stone layers are a bit hard to see in the photo. The horizontal lines are block divisions that were drawn on with a pencil and then etched in with a scriber.

The sign is made from 3mm high plastic letters sold by Model Builder's Supply. They're attached to layer 1 with Weld Bond. I should note that even though they look ok, they aren't prototypical. The actual building has letters cut into the facade's blocks. I didn't know how I'd replicate that at such a small scale, so I used some letters I had on hand.

I found this work relaxing, but I can see it isn't going to be finished as quickly as I had hoped. Maybe that's a good thing. The next job is to attach layers to the middle section.

Saturday, February 6, 2021

Art Metropole: Layers 0 and 1

I used the updated drawing to cut out the facade's base layers.

Layer 0 is the window layer. It's cut from a piece of clear 1/16" thick plastic - I'm not sure of the type of plastic other than it's a leftover that's been in my scrapbox for a longtime.

Layer 1 is the stone layer. It's cut from 4-ply 500 series Strathmore Bristol Board. I'm starting to appreciate why many of the old school builders liked this particular brand of Bristol Board. It cuts well and has a fine surface. 

The semi-circular window opening was cut out with a compass-like circle cutter. I think I need to buy another one as mine's made of plastic, and it was a bit wobbly in making the cut through the relatively thick card. I need to find out if there is a brand made of steel.

I'm moving on to building up layer 1 with pieces of thinner Strathmore to model the facade's stone relief.
Monday, February 1, 2021

Made to Measure

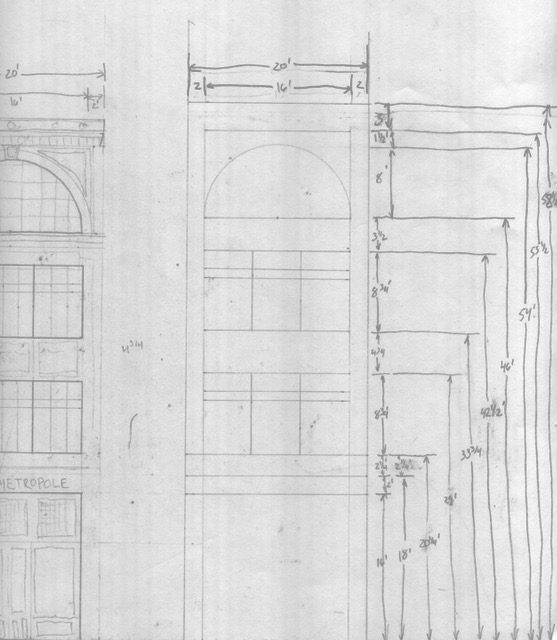
Progress is a bit slow on this project. Lockdown induced cabin fever was eating away at us yesterday, so we went for a long drive. The authorities would no doubt not approve, but getting away for a bit, along with seeing the sun, was good mental health-wise. Anyway, later in the day I had a go at re-jigging some dimensions on the Art Metropole drawing.

I didn't do much other than add a foot to the height of the middle windows, and make note of all the dimensions. I like to know the distance of each significant line from a reference point - in this case, the ground - because this information helps to reduce layout errors when drawing up the facade's pieces. I find that if one lays out a piece by just drawing the lines relative to each other instead of relative to a fixed point, it's easy to build up error in the layout. This isn't a problem with CAD, but if you're going old school, it's something to keep in mind. Next up: begin cutting out the pieces.

Friday, January 29, 2021

This is a test, this is only a test

I've got a number of big building projects in mind that involve large and elaborate facades of cut stone. I'm leaning towards using the old construction technique of building up facades with cardboard layers, but before diving into one of those intimidating buildings I thought I'd try out some of the methods on a smaller project.

I did a little of this sort of experimenting on the Thrifty's project, but it was much uglier than the big projects I have in mind. The old Art Metropole building on Yonge St. has features more in line with the styles I want to build, so I thought I'd try to make its facade as a test.

These days I think the Art Metropole has a payday loan company at street level and subdivided offices above. I'm going to back date the building a bit to be closer to that historic image I found on the internet. 

I've started on drawings. Over there is the first, but I think the middle windows need some adjustment. 

Full moon last night, so this is an auspicious start. I better get filled up on coffee!